我将介绍到如何在magento2中创建简单的Weicot Base (hello world)模块。
在magento2中,所有模块驻留在文件夹app/code中,
以前在magento1中有loca /community/core/文件夹的概念,但现在已被删除。
在这篇文章中,我们将看到如何创建一个新模块,创建一个路由并显示 “Hello Weicot Base ”
步骤1
magento2中的模块名称分为两部分“VendorName_ModuleName”
例如Magento_Contact,Magento_Catalog或Weicot_Base
第一部分是供应商(Weicot),第二部分是实际模块(Base)。
让我们将我们的模块名称改为“Weicot_Base”。首先,我们需要使文件夹
app\code\Weicot\Base
步骤2 – module.xml
接下来我们需要添加module.xml文件
app\code\Weicot\Base\etc\module.xml内容是
<?xml version="1.0"?>
<config xmlns:xsi="http://www.w3.org/2001/XMLSchema-instance" xsi:noNamespaceSchemaLocation="urn:magento:framework:Module/etc/module.xsd">
    <module name="Weicot_Base" setup_version="1.0.0">
    </module>
</config>
步骤3 – registration.php
接下来需要添加一个registration.php
app\code\Weicot\Base\registration.php内容会是
<?php
/**
 * Created by PhpStorm.
 * User:ajiang-tuzhi
 * QQ:1050653098@qq.com
 * WebSite:www.weicot.com
 * Date: 2016/12/16
 * Time: 21:54
 */
\Magento\Framework\Component\ComponentRegistrar::register(
    \Magento\Framework\Component\ComponentRegistrar::MODULE,
    'Weicot_Base',
    __DIR__
);
步骤4
现在一个空的模块准备好了,我们现在需要启用它。
方法A
在这个阶段如果你运行命令
php bin/magento module:status
你应该看到
禁用模块列表:
Weicot_Base
This means the module is setup, but it is disabled right now.
要启用模块,请运行命令
php bin/magento模块:启用Weicot_Base
这应启用你的模块。
方法B
另一种方法是去文件
app /etc/config.php
你会看到一个很长的模块列表,只需添加你的模块
... ...
'Weicot_Base'=> 1,
....
这个操作将会启用你的模块
在这一步后,当你在浏览器中打开你的网站,你会得到一个错误说
请升级您的数据库:从Magento根目录运行“bin/magento setup:upgrade”。
运行命令
bin/magento setup:upgrade
解决这个问题。
此时你应该设置的还是一个空的模块。
你还可以在系统配置 – >高级 – >禁用模块输出中查看模块
步骤5 – 路由
现在让我们为我们的模块添加一个路由(或url),以便我们可以显示”Hello Weicot Base ”
路由在magento分为3部分
http://s41.weicot.com/index.php/route_id/controller/action
index.php是可选的,取决于你的magento配置。如果你有.htaccess文件工作index.php不是必需的。
要添加路由,我们需要添加routes.xml文件
app\code\Weicot\Base\etc\frontend\routes.xml
因为这是一个前端路由,我们添加它在frontend /文件夹,否则我们需要将其添加到adminhtml /文件夹
文件的内容
<?xml version="1.0"?>
<config xmlns:xsi="http://www.w3.org/2001/XMLSchema-instance" xsi:noNamespaceSchemaLocation="urn:magento:framework:App/etc/routes.xsd">
    <router id="standard">
        <route id="base" frontName="base">
            <module name="Weicot_Base" />
        </route>
    </router>
</config>
我们通常保持id和frontName相同,否则可能会导致一些问题。
这里我们定义了路由的第一部分。所以到现在我们的路线是
s41.weicot.com/base/*
接下来我们需要定义我们的控制器,动作。
假设我们想要我们的URL
s41.weicot.com/base/index/index
为此,我们需要创建以下文件夹
app\code\Weicot\Base\Controller\index\Index.php
<?php

namespace Weicot\Base\Controller\Index;

use Magento\Framework\App\Action\Context;

class Index extends \Magento\Framework\App\Action\Action
{
    protected $_resultPageFactory;

    public function __construct(Context $context, \Magento\Framework\View\Result\PageFactory $resultPageFactory)
    {
        $this->_resultPageFactory = $resultPageFactory;
        parent::__construct($context);
    }

    public function execute()
    {
        $resultPage = $this->_resultPageFactory->create();
        return $resultPage;
    }
}
app\code\Weicot\Base\Block\Base.php
并在中添加以下内容
方法A 我用的是这个方法
<?php
namespace Weicot\Base\Block;

class Base extends \Magento\Framework\View\Element\Template
{
    public function getWeicotBaseTxt()
    {
        return 'Hello Weicot Base';
    }
}
方法B 此教程不使用这个方法
<?php
namespace Weicot\Base\Block;?
class Base extends \Magento\Framework\App\Action\Action
{
????public function __construct(
????????\Magento\Framework\App\Action\Context?$context)
????{
????????return parent::__construct($context);
????}
?????

????public function execute()
????{
????????echo 'Weicot Base';
????????exit;
????}?
}
?>
步骤6- 创建一个布局和模板文件
在Magento 2中,布局文件和模板放置在模块中的视图文件夹中。在视图文件夹中,我们可以有三个子文件夹:adminhtml,base和frontend。
adminhtml文件夹用于管理,前端文件夹用于前端,基本文件夹用于管理和前端文件。
首先,我们将使用以下代码在app\code\Weicot\Base\view\frontend\layout\文件夹中创建一个base_index_index.xml文件:
<page xmlns:xsi="http://www.w3.org/2001/XMLSchema-instance" xsi:noNamespaceSchemaLocation="../../../../../../../lib/internal/Magento/Framework/View/Layout/etc/page_configuration.xsd" layout="1column">
    <body>
        <referenceContainer name="content">
            <block class="Weicot\Base\Block\Base" name="base" template="base.phtml" />
        </referenceContainer>
    </body>
</page>
每个页面都有一个布局,我们都可以控制或操作 ,布局句柄是base_index_index。您可以为每个布局句柄创建布局配置文件。
在我们的布局文件中,我们向内容容器添加了一个块并设置了模板
我们的块到base.phtml,我们将在下一步中创建。
2.使用以下代码在app\code\Weicot\Base\view\frontend\templates\文件夹中创建base.phtml文件:
<h1> <? php echo $this->getWeicotBaseTxt(); ?> </ h1>
$这个变量反映了我们的块类,我们调用 $this->getWeicotBaseTxt() 方法,返回字符串’Hello Weicot Base!’。
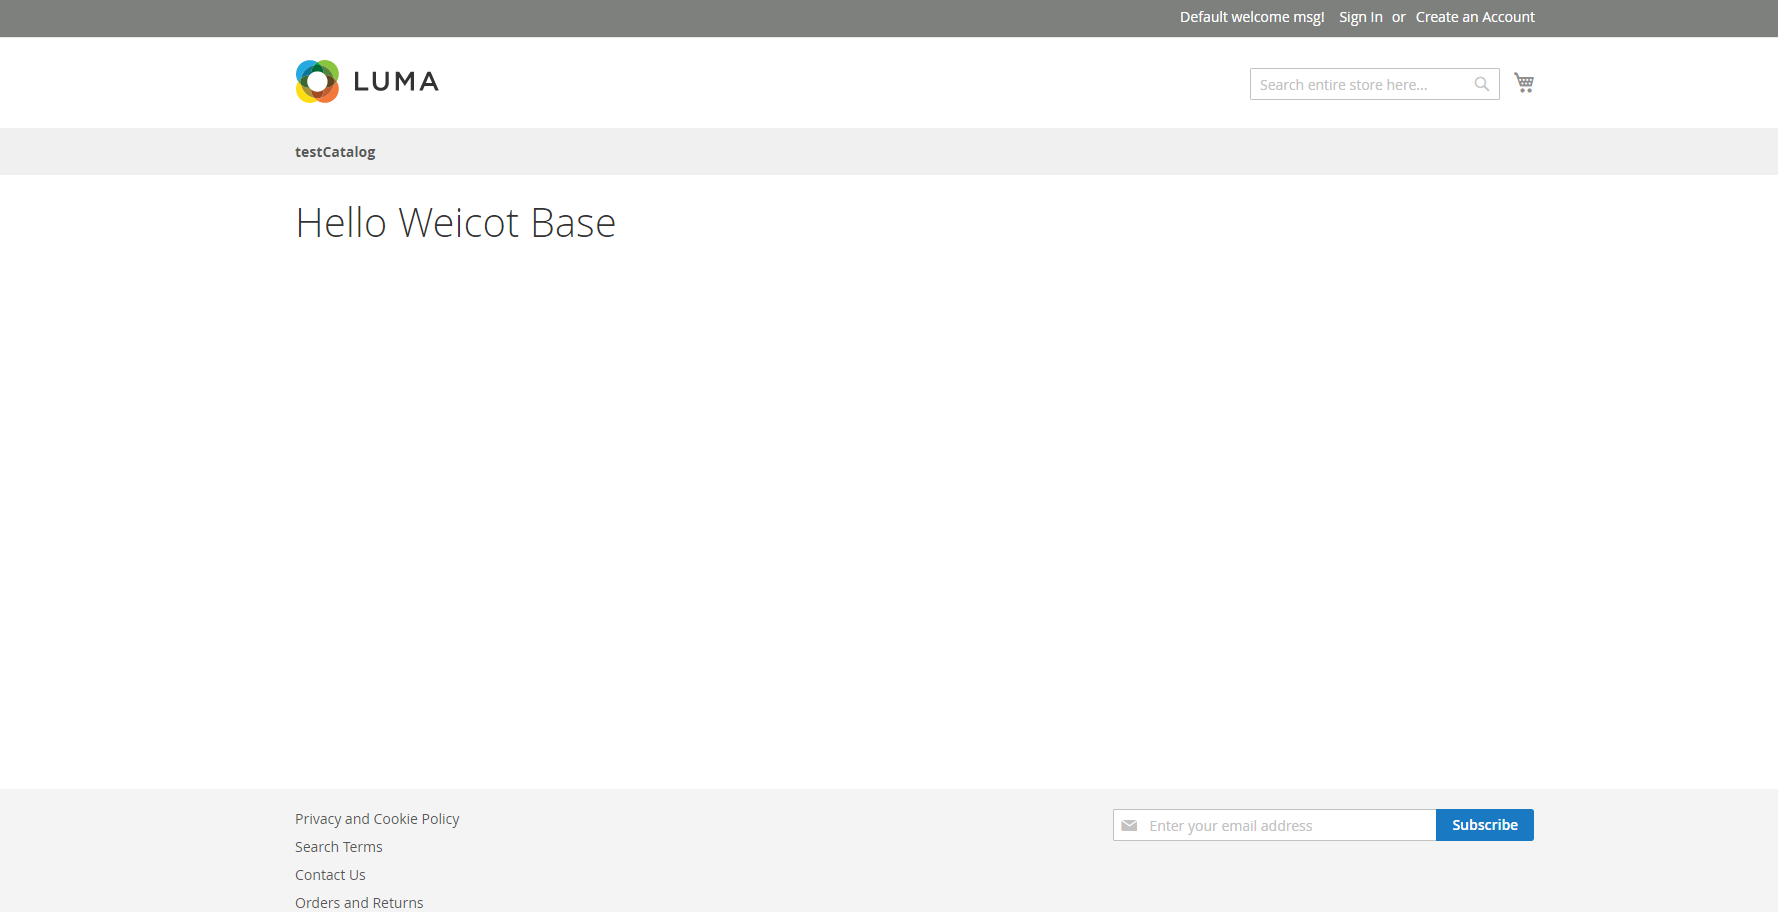
就是这样。在浏览器中打开/base/index/index URL,你应该得到这样的:
Hello Weicot Base
注意
Weicot\Base\Controller\index\Index.php
另一个重要的事情,magento在var\generation\Weicot\Base\Controller\index\Index创建自动生成的文件。
所以如果你注意到,你对控制器的更改不显示。 确保删除生成的缓存文件。
php bin/magento cache:flush
自动生成的文件
var\generation\Weicot\Base\Controller\index\Index\Interceptor.php
<?php
namespace Weicot\Base\Controller\index\Index;

/**
 * Interceptor class for @see \Weicot\Base\Controller\index\Index
 */
class Interceptor extends \Weicot\Base\Controller\index\Index implements \Magento\Framework\Interception\InterceptorInterface
{
    use \Magento\Framework\Interception\Interceptor;

    public function __construct(\Magento\Framework\App\Action\Context $context, \Magento\Framework\View\Result\PageFactory $resultPageFactory)
    {
        $this->___init();
        parent::__construct($context, $resultPageFactory);
    }

    /**
     * {@inheritdoc}
     */
    public function execute()
    {
        $pluginInfo = $this->pluginList->getNext($this->subjectType, 'execute');
        if (!$pluginInfo) {
            return parent::execute();
        } else {
            return $this->___callPlugins('execute', func_get_args(), $pluginInfo);
        }
    }

    /**
     * {@inheritdoc}
     */
    public function dispatch(\Magento\Framework\App\RequestInterface $request)
    {
        $pluginInfo = $this->pluginList->getNext($this->subjectType, 'dispatch');
        if (!$pluginInfo) {
            return parent::dispatch($request);
        } else {
            return $this->___callPlugins('dispatch', func_get_args(), $pluginInfo);
        }
    }

    /**
     * {@inheritdoc}
     */
    public function getActionFlag()
    {
        $pluginInfo = $this->pluginList->getNext($this->subjectType, 'getActionFlag');
        if (!$pluginInfo) {
            return parent::getActionFlag();
        } else {
            return $this->___callPlugins('getActionFlag', func_get_args(), $pluginInfo);
        }
    }

    /**
     * {@inheritdoc}
     */
    public function getRequest()
    {
        $pluginInfo = $this->pluginList->getNext($this->subjectType, 'getRequest');
        if (!$pluginInfo) {
            return parent::getRequest();
        } else {
            return $this->___callPlugins('getRequest', func_get_args(), $pluginInfo);
        }
    }

    /**
     * {@inheritdoc}
     */
    public function getResponse()
    {
        $pluginInfo = $this->pluginList->getNext($this->subjectType, 'getResponse');
        if (!$pluginInfo) {
            return parent::getResponse();
        } else {
            return $this->___callPlugins('getResponse', func_get_args(), $pluginInfo);
        }
    }
}
参考与引用
magento2 命令行的使用 及用命令行开发以及刷索引等
Magento 1 config.xml system.xml 解释
Magento1的布局(Layout),块(Block)和模板(Template)