系统
使用的是 CentOS 7 最小化安装的iso镜像 64位 636M VPS服务商 默认安装的系统
版本 CentOS-7-x86_64-Minimal-1503-01.iso
本地测试CentOS minimal 安装的一些记录
大致版本 与大部分VPS 服务商所用的安装系统一致
以下环境搭建教程 基本可以适用于各大VPS 服务商 包括国内
准备
安装 GCC
yum install gcc
yum install gcc-c++
安装 VIM
yum install vim
安装sendmail 非必须(一个发送邮件的工具)
[root@localhost ~]# yum install -y sendmail
[root@localhost ~]# yum -y sendmail-cf
[root@localhost ~]# vi /etc/mail/sendmail.mc
[root@localhost ~]# m4 /etc/mail/sendmail.mc > /etc/mail/sendmail.cf
[root@localhost ~]# echo "test" | sendmail 1050653098@qq.com
[root@localhost ~]# vim /etc/hostname
[root@localhost ~]# hostname service1.com
[root@localhost ~]# hostname
service1.com
[root@localhost ~]# echo "test" | sendmail 1050653098@qq.com
[root@localhost ~]# mailq
/var/spool/mqueue is empty
		Total requests: 0
您在 /var/spool/mail/root 中有邮件
参考
CentOS安装sendmail及设置 排错 等等。。。。
send mail 拒收 或被列入垃圾箱问题
备注
因为它叫这个 mailx 正确的命令 yum -y install mailx
2. 测试本机是否开启 25 端口 以及外网是否可以访问
使用 nc -t 你的服务器外部ip地址 25 在其他服务器执行
如果出现 这个则视为成功
[root@localhost ~]# nc -t xx.xx.xx.xx 25
220 weicotfex.linode.com ESMTP Sendmail 8.14.7/8.14.7; Wed, 12 Jul 2017 08:18:07 GMT
HELLO
500 5.5.1 Command unrecognized: “HELLO”
安装mariadb或mysql数据库(只用安装其中一种数据库)
安装 mariadb
[root@localhost ~]# yum install mysql mysql-service
[root@localhost ~]# mysql
ERROR 2002 (HY000): Can't connect to local MySQL server through socket '/var/lib/mysql/mysql.sock' (2)
[root@localhost ~]# yum -y install mariadb*
[root@localhost mysql]# systemctl start mariadb.service
[root@localhost mysql]# mysql -u root -p
Enter password:
Welcome to the MariaDB monitor.  Commands end with ; or \g.
Your MariaDB connection id is 2
Server version: 5.5.44-MariaDB MariaDB Server

Copyright (c) 2000, 2015, Oracle, MariaDB Corporation Ab and others.

Type 'help;' or '\h' for help. Type '\c' to clear the current input statement.

MariaDB [(none)]>
Centos7 安装MySql Mariadb
安装mysql
liunx 下 或centos7 下安装 MySQL-5.6
安装PHP(只用安装其中一个版本)
安装php 5.6
[root@localhost mysql]# rpm -Uvh http://mirror.centos.org/centos/7/extras/x86_64/Packages/epel-release-7-9.noarch.rpm
//备用地址 ftp://fr2.rpmfind.net/linux/centos/7.2.1511/extras/x86_64/Packages/epel-release-7-5.noarch.rpm
[root@localhost mysql]# rpm -Uvh http://rpms.famillecollet.com/enterprise/remi-release-7.rpm
//rpm -Uvh 升级一个包
//如果以上地址提示不存在的话
//1.请用谷歌或百度 搜索包名 epel-release-7-5.noarch.rpm
//2.wget 下载包的地址
//3.rpm -Uvh 下载后的包名
[root@localhost mysql]# yum list --enablerepo=remi --enablerepo=remi-php56 | grep php
[root@localhost mysql]# yum install --enablerepo=remi --enablerepo=remi-php56 php php-opcache php-pecl-apcu php-devel php-mbstring php-mcrypt php-mysqlnd php-phpunit-PHPUnit php-pecl-xdebug php-pecl-xhprof php-pdo php-pear php-fpm php-cli php-xml php-bcmath php-process php-gd php-common
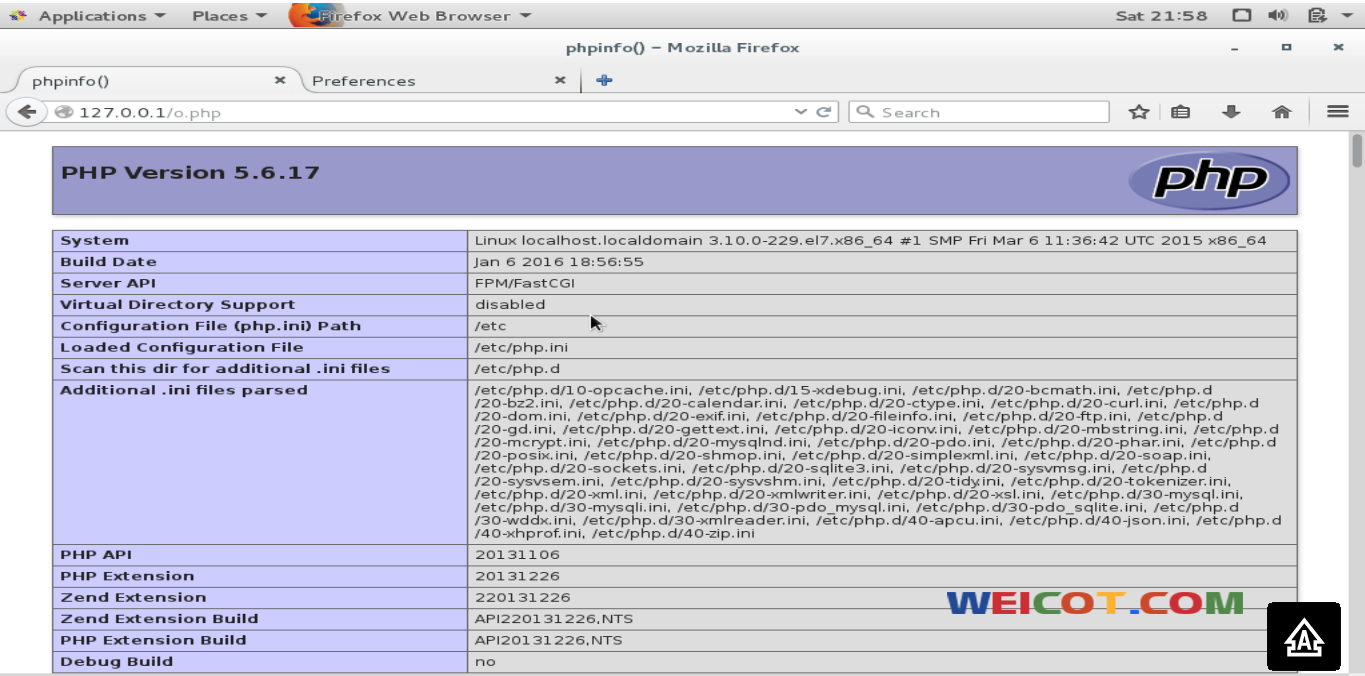
[root@localhost mysql]# php -v
PHP 5.6.17 (cli) (built: Jan 6 2016 18:56:36)
Copyright (c) 1997-2015 The PHP Group
Zend Engine v2.6.0, Copyright (c) 1998-2015 Zend Technologies
with Zend OPcache v7.0.6-dev, Copyright (c) 1999-2015, by Zend Technologies
with Xdebug v2.3.3, Copyright (c) 2002-2015, by Derick Rethans
安装或升级PHP 7.4、7.3、7.2等
在CentOS 7和RHEL 7服务器上升级或新安装PHP 7.4、7.3、7.2、7.1
PHP 与MYSQL 链接
//如果要使用默认地址 可以使用 ps -ef|grep mysql 确定 mysql.sock 的位置
// 以下操作为修改
[root@localhost mysql]# find / -name my.cnf
/etc/my.cnf
[root@localhost mysql]# vim /etc/my.cnf
[VIMCONTENT]
socket=/var/lib/mysql/mysql.sock
[root@localhost mysql]# vim /etc/php.ini
[VIMCONTENT]
; http://php.net/mysql.default-socket
mysql.default_socket =/var/lib/mysql/mysql.sock
[root@localhost mysql]# systemctl restart  php-fpm.service
[root@localhost home]# cd /home
//如果有修改mysql 的配置文件可以通过 ps -ef|grep mysql 找到mysql的id并kill掉
//然后通过 /usr/local/mysql/bin/mysqld_safe --user=mysql &  重启
//php -i |grep mysql 检查配置情况
测试 PHP 和mysql 的链接
[root@localhost home]# vim db.php
<?php mysql_connect('localhost','root','');
 mysql_select_db('mysql');
 $q=mysql_query("select * from user where user='root' limit 1");
 $r=mysql_fetch_assoc($q); print_r($r); ?>
[root@localhost home]# php db.php
Array
(
    [Host] => localhost
    [User] => root
    [Password] =>
    [Select_priv] => Y
    .................
)
参考与引用
systemctl跟 ip 命令用法
安装NGINX
[root@localhost home]# yum -y install zlib zlib-devel openssl openssl-devel pcre-devel
[root@localhost home]# wget http://nginx.org/download/nginx-1.9.2.tar.gz
[root@localhost home]# tar -zxvf nginx-1.9.2.tar.gz
[root@localhost home]# cd nginx-1.9.2
[root@localhost nginx-1.9.2]# ./configure --help
//添加权限
[root@localhost init.d]# /usr/sbin/groupadd -f nginx
[root@localhost init.d]# /usr/sbin/useradd -g nginx nginx
[root@localhost nginx-1.9.2]# ./configure --prefix=/etc/nginx --sbin-path=/usr/sbin/nginx --conf-path=/etc/nginx/nginx.conf --error-log-path=/var/log/nginx/error.log --http-log-path=/var/log/nginx/access.log --pid-path=/var/run/nginx.pid --lock-path=/var/run/nginx.lock --http-client-body-temp-path=/var/cache/nginx/client_temp --http-proxy-temp-path=/var/cache/nginx/proxy_temp --http-fastcgi-temp-path=/var/cache/nginx/fastcgi_temp --http-uwsgi-temp-path=/var/cache/nginx/uwsgi_temp --http-scgi-temp-path=/var/cache/nginx/scgi_temp --user=nginx --group=nginx --with-http_ssl_module --with-http_realip_module --with-http_addition_module --with-http_sub_module --with-http_dav_module --with-http_flv_module --with-http_mp4_module --with-http_gunzip_module --with-http_gzip_static_module --with-http_random_index_module --with-http_secure_link_module --with-http_stub_status_module --with-http_auth_request_module --with-mail --with-mail_ssl_module --with-file-aio --with-ipv6 --with-http_spdy_module --with-cc-opt='-O2 -g -pipe -Wp,-D_FORTIFY_SOURCE=2 -fexceptions -fstack-protector --param=ssp-buffer-size=4 -m64 -mtune=generic';
[root@localhost nginx-1.9.2]# make && make install
[root@localhost nginx-1.9.2]# nginx -v
nginx version: nginx/1.9.2
添加 nginx 控制脚本
[root@localhost nginx]# cd /home
[root@localhost home]# vim nginx  [这是控制脚本  不是nginx 文件目录 ]
//脚本地址 http://www.weicot.com/linux-%e4%b8%8b%e5%ae%89%e8%a3%85nginx-%e5%8f%8a%e7%ae%a1%e7%90%86-%e8%84%9a%e6%9c%ac/
[root@localhost home]# mv nginx /etc/init.d/ && cd /etc/init.d/
[root@localhost init.d]# chkconfig --add nginx
[root@localhost init.d]# chkconfig --list nginx

注意:该输出结果只显示 SysV 服务,并不包含原生 systemd 服务。SysV 配置数据可能被原生 systemd 配置覆盖。
      如果您想列出 systemd 服务,请执行 'systemctl list-unit-files'。
      欲查看对特定 target 启用的服务请执行
      'systemctl list-dependencies [target]'。

nginx          	0:关	1:关	2:关	3:关	4:关	5:关	6:关

[root@localhost init.d]#  chmod a+x /etc/init.d/nginx
[root@localhost init.d]# service nginx restart
Restarting nginx (via systemctl):                          [  确定  ]
测试
[root@localhost html]# cd /etc/nginx/html
[root@localhost html]# ls
// 不知道怎么找 本机ip 的 用这个命令 ip address  那个看起来像外网合法ip 的就是
50x.html  index.html
[root@localhost html]# vim info.html
//浏览器输出
This is  tets page
page from weicot.com
参考与引用
Centos 或 Linux 下安装NGINX 及管理脚本
Linux 下防火墙 Iptables 或 Firewalle 常用命令
NGINX 与 PHP
开放80端口
[root@localhost init.d]# systemctl start firewalld
[root@localhost init.d]# systemctl status  firewalld
● firewalld.service - firewalld - dynamic firewall daemon
   Loaded: loaded (/usr/lib/systemd/system/firewalld.service; enabled; vendor preset: enabled)
   Active: active (running) since 六 2016-01-16 14:22:21 CST; 1h 57min ago
   ..........................................................
[root@localhost init.d]# firewall-cmd --zone=dmz --add-port=80/tcp
success
[root@localhost init.d]# firewall-cmd --zone=dmz --list-ports
80/tcp
//进入到 nginx 目录
[root@localhost nginx]# cd /etc/nginx/
[root@localhost nginx]# vim nginx.conf
//nginx 配置 请查看代码一
[root@localhost nginx]# systemctl restart nginx.service
PHP 与sendMail 绑定
[root@localhost nginx]# vim /etc/php.ini
; http://php.net/sendmail-path
sendmail_path = /usr/sbin/sendmail -t -i -f root@weicotservice.com
[root@localhost nginx]# systemctl restart php-fpm.service
展示下作品
本来想搭建分布式的 不过这么晚 下次吧
php-fpm mysql nginx 权限配置
看看各个模块运行在哪个用户下面,使用ps命令查看。如下
ps aux|grep nginx
ps aux |grep mysql
ps aux |grep php-fpm
php-fpm 的默认用户
[root@li331-172 w2]# vim /etc/php-fpm.d/www.conf

; Unix user/group of processes
; Note: The user is mandatory. If the group is not set, the default user's group
;       will be used.
; RPM: apache Choosed to be able to access some dir as httpd
user = apache
; RPM: Keep a group allowed to write in log dir.
group = apache
更改为
; Unix user/group of processes
; Note: The user is mandatory. If the group is not set, the default user's group
;       will be used.
; RPM: apache Choosed to be able to access some dir as httpd
user =nginx
; RPM: Keep a group allowed to write in log dir.
group = nginx
地址 /home/wwwroot/w2 的权限更改为 nginx
sudo chgrp -R nginx .
sudo chown -R nginx .
chmod -R 775 .
[root@li331-172 w2]# ll
total 196
-rwxrwxr-x  1 nginx nginx   418 Sep 25  2013 index.php
-rwxrwxr-x  1 nginx nginx 19935 Jan  2 18:51 license.txt
-rwxrwxr-x  1 nginx nginx  6956 Mar  7 05:14 readme.html
drwsrwsr-x  2 nginx nginx  4096 May 10 10:10 wordpress
-rwxrwxr-x  1 nginx nginx  5447 Sep 27  2016 wp-activate.php
drwsrwsr-x  9 nginx nginx  4096 Mar  7 05:14 wp-admin
-rwxrwxr-x  1 nginx nginx   364 Dec 19  2015 wp-blog-header.php
-rwxrwxr-x  1 nginx nginx  1627 Aug 29  2016 wp-comments-post.php
-rwxrwxr-x  1 nginx nginx  3097 May 10 10:12 wp-config.php
-rwxrwxr-x  1 nginx nginx  2930 Mar  7 05:14 wp-config-sample.php
drwsrwsr-x  7 nginx nginx  4096 May 11 02:46 wp-content
-rwxrwxr-x  1 nginx nginx  3286 May 24  2015 wp-cron.php
drwsrwsr-x 18 nginx nginx 12288 Mar  7 05:14 wp-includes
-rwxrwxr-x  1 nginx nginx  2422 Nov 21 02:46 wp-links-opml.php
-rwxrwxr-x  1 nginx nginx  3301 Oct 25  2016 wp-load.php
-rwxrwxr-x  1 nginx nginx 33939 Nov 21 02:46 wp-login.php
-rwxrwxr-x  1 nginx nginx  8048 Jan 11 05:15 wp-mail.php
-rwxrwxr-x  1 nginx nginx 16250 Nov 29 05:39 wp-settings.php
-rwxrwxr-x  1 nginx nginx 29896 Oct 19  2016 wp-signup.php
-rwxrwxr-x  1 nginx nginx  4513 Oct 14  2016 wp-trackback.php
-rwxrwxr-x  1 nginx nginx  3065 Aug 31  2016 xmlrpc.php
自此 各个运行权限为
Nginx 组 Nginx Nginx
Php-Fpm 组 Nginx Nginx
Mysql 组 Mysql Mysql
网站根目录 组 Nginx Nginx
注意 权限不匹配将无法上传 文件 或执行其他需要较大权限的事
我nginx 的配置 nginx.conf
user  nginx;
worker_processes  1;

#error_log  logs/error.log;
#error_log  logs/error.log  notice;
#error_log  logs/error.log  info;

#pid        logs/nginx.pid;

events {
    worker_connections  1024;
}

http {
    include       mime.types;
    default_type  application/octet-stream;

    #log_format  main  '$remote_addr - $remote_user [$time_local] "$request" '
    #                  '$status $body_bytes_sent "$http_referer" '
    #                  '"$http_user_agent" "$http_x_forwarded_for"';

    #access_log  logs/access.log  main;

    sendfile        on;
    #tcp_nopush     on;

    #keepalive_timeout  0;
    keepalive_timeout  65;

    #gzip  on;

    server {
        listen       80;
        server_name  localhost;

        #charset koi8-r;

        #access_log  logs/host.access.log  main;

        location / {
            root   html;
            index  index.html index.htm;
        }

        #error_page  404              /404.html;

        # redirect server error pages to the static page /50x.html
        #
        error_page   500 502 503 504  /50x.html;
        location = /50x.html {
            root   html;
        }

        # proxy the PHP scripts to Apache listening on 127.0.0.1:80
        #
        #location ~ \.php$ {
        #    proxy_pass   http://127.0.0.1;
        #}

        # pass the PHP scripts to FastCGI server listening on 127.0.0.1:9000
        #
        location ~ \.php$ {
            root           html;
            fastcgi_pass   127.0.0.1:9000;
            fastcgi_index  index.php;
            fastcgi_param  SCRIPT_FILENAME $document_root$fastcgi_script_name;
            include        fastcgi_params;
        }

        # deny access to .htaccess files, if Apache's document root
        # concurs with nginx's one
        #
        #location ~ /\.ht {
        #    deny  all;
        #}
    }

    # another virtual host using mix of IP-, name-, and port-based configuration
    #
    #server {
    #    listen       8000;
    #    listen       somename:8080;
    #    server_name  somename  alias  another.alias;

    #    location / {
    #        root   html;
    #        index  index.html index.htm;
    #    }
    #}

    # HTTPS server
    #
    #server {
    #    listen       443 ssl;
    #    server_name  localhost;

    #    ssl_certificate      cert.pem;
    #    ssl_certificate_key  cert.key;

    #    ssl_session_cache    shared:SSL:1m;
    #    ssl_session_timeout  5m;

    #    ssl_ciphers  HIGH:!aNULL:!MD5;
    #    ssl_prefer_server_ciphers  on;

    #    location / {
    #        root   html;
    #        index  index.html index.htm;
    #    }
    #}

}
nginx 多站点配置文件
//nginx 主配置文件   /etc/nginx/nginx.conf
//请确保 一下网站所用的目录存在
#weicot nginx more vhost test file
user  nginx;
worker_processes auto;
error_log  /home/wwwlogs/nginx_error.log  crit;

#pid        /usr/local/nginx/logs/nginx.pid;

#Specifies the value for maximum file descriptors that can be opened by this process.
worker_rlimit_nofile 51200;

events
    {
        use epoll;
        worker_connections 51200;
        multi_accept on;
    }

http
    {
        include       mime.types;
        default_type  application/octet-stream;

        server_names_hash_bucket_size 128;
        client_header_buffer_size 32k;
        large_client_header_buffers 4 32k;
        client_max_body_size 50m;

        sendfile   on;
        tcp_nopush on;

        keepalive_timeout 60;

        tcp_nodelay on;

        fastcgi_connect_timeout 300;
        fastcgi_send_timeout 300;
        fastcgi_read_timeout 300;
        fastcgi_buffer_size 64k;
        fastcgi_buffers 4 64k;
        fastcgi_busy_buffers_size 128k;
        fastcgi_temp_file_write_size 256k;

        gzip on;
        gzip_min_length  1k;
        gzip_buffers     4 16k;
        gzip_http_version 1.1;
        gzip_comp_level 2;
        gzip_types     text/plain application/javascript application/x-javascript text/javascript text/css application/xml application/xml+rss;
        gzip_vary on;
        gzip_proxied   expired no-cache no-store private auth;
        gzip_disable   "MSIE [1-6]\.";

        #limit_conn_zone $binary_remote_addr zone=perip:10m;
        ##If enable limit_conn_zone,add "limit_conn perip 10;" to server section.

        server_tokens off;
        access_log off;

server
    {
        listen 80 default_server;
        #listen [::]:80 default_server ipv6only=on;
        server_name www.weicot.com;
        index index.html index.htm index.php;
        root  /home/wwwroot/default;

        #error_page   404   /404.html;
        include enable-php.conf;

        location /nginx_status
        {
            stub_status on;
            access_log   off;
        }

        location ~ .*\.(gif|jpg|jpeg|png|bmp|swf)$
        {
            expires      30d;
        }

        location ~ .*\.(js|css)?$
        {
            expires      12h;
        }

        location ~ /\.
        {
            deny all;
        }

        access_log  /home/wwwlogs/access.log;
    }
include vhost/*.conf;
}
//nginx-php 配置文件   /etc/nginx/enable-php.conf;
        location ~ [^/]\.php(/|$)
        {
            try_files $uri =404;
            fastcgi_pass   127.0.0.1:9000;
            #fastcgi_pass  unix:/tmp/php-cgi.sock;  理论上单机这个比较快
            fastcgi_index index.php;
            include fastcgi.conf;
        }
//nginx 虚拟配置文件位置 /etc/nginx/vhost/*.conf;
Nginx 多站点示例 Magnto 配置示例
// magento nginx  虚拟配置文件位置   /etc/nginx/vhost/s1.conf

server
    {
        listen 80;
        #listen [::]:80;
        server_name s1.weicot.com;
        index index.html index.htm index.php default.html default.htm default.php;
        root  /home/wwwroot/s1;

        include mage.conf;
        #error_page   404   /404.html;
        include enable-php.conf;

        location ~ .*\.(gif|jpg|jpeg|png|bmp|swf)$
        {
            expires      30d;
        }

        location ~ .*\.(js|css)?$
        {
            expires      12h;
        }

        location ~ /\.
        {
            deny all;
        }

        access_log  /home/wwwlogs/s1.weicot.log;
    }
//nginx mage 主配置文件   /etc/nginx/mage.conf
location / {
        index index.html index.php; ## Allow a static html file to be shown first
        try_files $uri $uri/ @handler; ## If missing pass the URI to Magento's front handler
        expires 30d; ## Assume all files are cachable
    }

    ## These locations would be hidden by .htaccess normally
    location /app/                { deny all; }
    location /includes/           { deny all; }
    location /lib/                { deny all; }
    location /media/downloadable/ { deny all; }
    location /pkginfo/            { deny all; }
    location /report/config.xml   { deny all; }
    location /var/                { deny all; }

    location /var/export/ { ## Allow admins only to view export folder
        auth_basic           "Restricted"; ## Message shown in login window
        auth_basic_user_file htpasswd; ## See /etc/nginx/htpassword
        autoindex            on;
    }
      location  /. { ## Disable .htaccess and other hidden files
        return 404;
    }

    location @handler { ## Magento uses a common front handler
        rewrite / /index.php;
    }

    location ~ .php/ { ## Forward paths like /js/index.php/x.js to relevant handler
        rewrite ^(.*.php)/ $1 last;
    }
防火墙配置 相关
centos 7 中旧版命令安装 ifconfig netstat
yum search ifconfig 搜索包含这个的包
通过yum search 这个命令发现
ifconfig这个命令是在net-tools.x86_64这个包里,
接下来我们安装这个包就行了
运行 yum install net-tools
其实 ip 命令挺好用的
ip route ip路由
ip address 地址
开启80端口 firewall
firewall-cmd --zone=public --add-port=80/tcp --permanent
出现success表明添加成功
命令含义:
–zone #作用域
–add-port=80/tcp #添加端口,格式为:端口/通讯协议
–permanent #永久生效,没有此参数重启后失效
重启防火墙
systemctl restart firewalld.service
1、运行、停止、禁用firewalld
启动:# systemctl start firewalld
查看状态:# systemctl status firewalld 或者 firewall-cmd –state
停止:# systemctl disable firewalld
禁用:# systemctl stop firewalld
开启80端口 iptables
查看开放的端口
sudo /etc/init.d/iptables status
开放指定端口
开放80端口,允许数据包从80端口进入,开放其它端口一样改成对应的数字,比如ftp21和ssh的22端口
sudo iptables -A INPUT -p tcp --dport 80 -j ACCEPT
保存所做的更改
sudo /etc/rc.d/init.d/iptables save
转载请注明:(●--●) Hello.My Weicot » Centos7+Mysql/MariaDB+sendMail+Nginx+PHP 环境搭建一条龙