Contents
- Overview of cron
- First steps
- Run cron in the background
- Configure and run cron using the command line
To run cron in a web browser, see Secure cron.php to run in a browser
Overview of cron
Several Magento features require at least one cron job, which schedules activities to occur in the future. A partial list of these activities follows:
- Catalog price rules
- Newsletters
- Generating Google sitemaps
- Customer Alerts/Notifications (product price change, product back in stock)
- Reindexing
- Private sales (Magento EE only)
- Automatic updating of currency rates
- All Magento e-mails (including order confirmation and transactional)
We recommend you run cron as the Magento file system owner. Do not run cron as root; we recommend against running cron as the web server user.
You can no longer run dev/tools/cron.sh because the script has been removed.
Magento depends on proper cron job configuration for many important system functions, including indexing. Failure to set it up properly means Magento won't function as expected.
UNIX systems schedule tasks to be performed by particular users using a crontab, which is a file that contains instructions to the cron daemon that tell the daemon in effect to вҖңrun this command at this time on this dateвҖқ. Each user has its own crontab, and commands in any given crontab are executed as the user who owns it.
See one of the following sections:
First steps
-
Log in to the Magento server as, or switch to, a user who has permissions to write to the Magento file system. One way to do this is to switch to the Magento file system owner.
If you use the bash shell, you can also use the following syntax to switch to the Magento file system owner and enter the command at the same time:
su <Magento file system owner> -s /bin/bash -c <command> -
To run Magento commands from any directory, add
<your Magento install dir>/binto your systemPATH.Because shells have differing syntax, consult a reference like unix.stackexchange.com.
bash shell example for CentOS:
export PATH=$PATH:/var/www/html/magento2/bin
You can also run the commands in the following ways:
cd <your Magento install dir>/binand run them as./magento <command name>php <your Magento install dir>/bin/magento <command name>
<your Magento install dir> is a subdirectory of your web server's docroot. Need help locating the docroot? Click here.
In addition to the command arguments discussed here, see Common arguments.
Run cron in the background
This section discusses how to run all Magento cron jobs every minute, which is the recommended interval for both Magento Community Edition (CE) and Enterprise Edition (EE).
Cron is critical for Magento operation; among other things, it's the only way to reindex on an ongoing basis, it generates automated e-mails, newsletters, the sitemap, and so on.
Run Magento cron jobs as the Magento file system owner.
Prerequisites
Magento uses cron for two sets of tasks, and for each, cron can be run with a different configuration:
- The general cron job that reindexes indexers, generates e-mails, generates the sitemap, and so on, typically runs as the PHP command-line userвҖҷs
php.ini - Two other cron jobs are used by the Component Manager and System Upgrade utilities. Those commands must use the web serverвҖҷs
php.ini.
If youвҖҷre not experienced with running cron, you can run all commands with the web serverвҖҷs configuration; however, we leave the decision up to you.
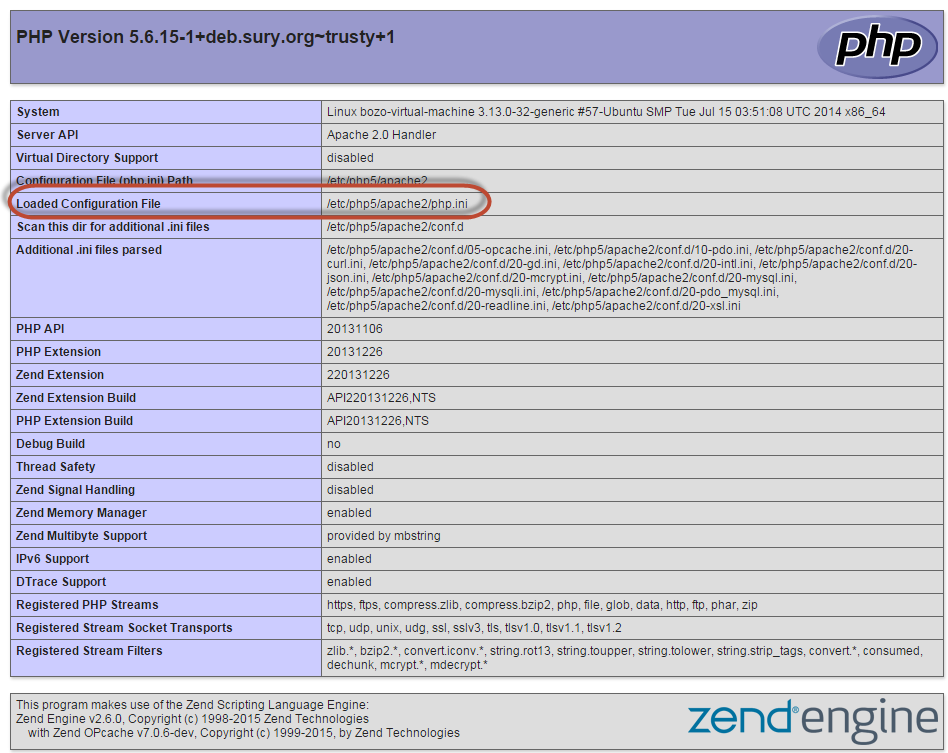
Find the web server configuration
To find the web server configuration, run a phpinfo.php file in your web browser and look for the Loaded Configuration File as follows:
Find the PHP binary
To display the path to your PHP binary, enter
which php
A sample result follows:
/usr/bin/php
Create the cron job
To create a cron job as the Magento file system owner, enter the following command as a user with root privileges:
crontab -u <Magento file system owner user name> -e
For example,
crontab -u magento_user -e
A text editor displays. (You might need to choose a text editor first.)
*/1 * * * * <path-to-binary> -c <ini-file-path> <your Magento install dir>/bin/magento cron:run [> <log-file>&]
*/1 * * * * <path-to-binary> -c <ini-file-path> <your Magento install dir>/update/cron.php [> <log-file>&]
*/1 * * * * <path-to-binary> -c <ini-file-path> <your Magento install dir>/bin/magento setup:cron:run [> <log-file>&]
where
<path-to-binary>is the absolute file system path to your PHP binary<ini-file-path>is the path to aphp.inifile to use for the cron job[> <log-file>&]is an optional but recommended string that appends cron output to a file. This is particularly useful for troubleshooting errors.
The first command (magento cron:run) reindexes indexers, send automated e-mails, generates the sitemap, and so on. Usually itвҖҷs associated with the PHP command line .ini file. The other two commands are used by the Component Manager and System Upgrade.
For example, if the PHP binary is located in /usr/bin, you installed Magento in /var/www/html/magento2, and all commands use the web serverвҖҷs php.ini, enter
Example:
*/1 * * * * /usr/bin/php -c /etc/php5/apache2/php.ini /var/www/magento2/bin/magento cron:run > /var/www/magento2/var/log/magento.cron.log&
*/1 * * * * /usr/bin/php -c /etc/php5/apache2/php.ini /var/www/magento2/update/cron.php > /var/www/magento2/var/log/update.cron.log&
*/1 * * * * /usr/bin/php -c /etc/php5/apache2/php.ini /var/www/magento2/bin/magento setup:cron:run > /var/www/magento2/var/log/setup.cron.log&
Save your changes to the crontab and exit the editor.
Configure and run cron using the command line
This section discusses how to run cron at any time using the command line. You can optionally configure a cron group for a custom module as discussed in the next section.
Most Magento modules are in the default group; other modules are in the index group.
See one of the following sections:
Configure cron groups for custom modules
This section discusses how to optionally create a cron group for a custom module. If you donвҖҷt need to do this, continue with the next section.
A cron group is a logical group that enables you to easily run cron for more than one process at a time. Most Magento modules use the default cron group; some modules use the index group.
If youвҖҷre implementing cron for a custom module, itвҖҷs your choice of whether or not to use the default group or a different group.
To configure a cron group for your module, create <your component base dir>/<vendorname>/module-<name>/etc/crontab.xml with the following contents:
<config>
	<group id="<group_name>">
        <job name="<job_name>" instance="<classpath>" method="<method>">
            <schedule><time></schedule>
        </job>
    </group>
</config>
The following table discusses the meanings of the options.
| Value | Description |
|---|---|
<group_name> |
Name of the cron group. The group name doesn't have to be unique. You can run cron for one group at a time. |
<job_name> |
Unique ID for this cron job. |
<classpath> |
Classpath. |
<method> |
Method in |
<time> |
Schedule in cron format. Omit this parameter if the schedule is defined in the Magento database or other storage. |
In addition, the <group> element supports the following options, all of which run in store view scope:
| Option | Description |
|---|---|
schedule_generate_every |
Determines the frequency, in minutes, that schedules are written to the |
schedule_ahead_for |
Determines the number of minutes in advance that schedules are written to the |
schedule_lifetime |
Schedule lifetime in minutes. |
history_cleanup_every |
Determines the number of minutes that cron history is kept in the database. |
history_success_lifetime |
Determines the number of minutes that the record of successfully completed cron jobs are kept in the database. |
history_failure_lifetime |
Determines the number of minutes that the record of failed cron jobs are kept in the database. |
use_separate_process |
If set to If set to |
As an example, see Magento_Customer crontab.xml
Run cron from the command line
Command options:
magento cron:run [--group="<cron group name>"]
where --group specifies the cron group to run (omit this option to run cron for the default group)
- You can run cron for one group at a time.
- You must run cron twice: the first time to discover tasks to run and the second time to run the tasks themselves.
Find us on