
Contents
- Configure Solr to work with Magento
- Reindexing catalog search and refreshing the full page cache
- Verify Solr is working
Configure Solr to work with Magento
The following topics discuss how to configure Solr to work with Magento EE:
Copy the Magento Solr configuration and start Solr
Magento comes packaged with a sample Solr configuration you can use and customize. To get started, youвҖҷll copy the Magento configuration to Solr, replacing any existing files. After that you can start Solr and begin configuring Magento to work with it.
The example Solr configuration is not intended to be used in a production site. It's for testing and development only. It's simple to use which makes it a great way for you to learn more about Solr.
-
As a user with
rootprivileges, enter the following commands in the order shown to copy over the Solr configuration with the one packaged with Magento EE:cd <your Solr install dir>/example/solr cp -R collection1 magento2/conf cd magento2 cp -R <your Magento EE install dir>/vendor/magento/module-solr/conf/* .For example, if Solr is installed in
/opt/solr/solr-4.10.4and Magento EE is installed in/var/www/magento/html/magento2ee, enter:cd /opt/solr/solr/solr-4.10.4 cp -R collection1 magento2 cd magento2 cp -R /var/www/html/magento2ee/vendor/magento/module-solr/conf/* .If you're prompted to overwrite files, try the command
\cp -R <your Magento EE install dir>/vendor/magento/module-solr/conf/* . -
After copying files, open
example/solr/core.propertiesin a text editor and change:name=collection1to
name=magento2 -
Save your changes to
core.propertiesand exit the text editor. -
Task for Tomcat 6 with CentOS only
If youвҖҷre using Tomcat 6 on CentOS, you must modify
<your Solr install dir>/example/solr/conf/solrconfig.xmlLocate the following line:
<dataDir>${solr.data.dir:./solr/data}</dataDir>Change it to:
<dataDir>${solr.data.dir:}</dataDir> -
Start Solr.
As a user with
rootprivileges, enter the following command to start Solr:java -jar <your Solr install dir>/example/start.jarThis method for starting Solr is for convenience and testing purposes only. In a production environment, you should start and stop Solr using a script as discussed in Script Solr startup and shutdown.
Configure Magento to work with Solr
This section discusses how to configure Magento EE to use the Solr search engine.
To configure Magento to work with Solr:
- Log in to the Magento Admin as an administrator.
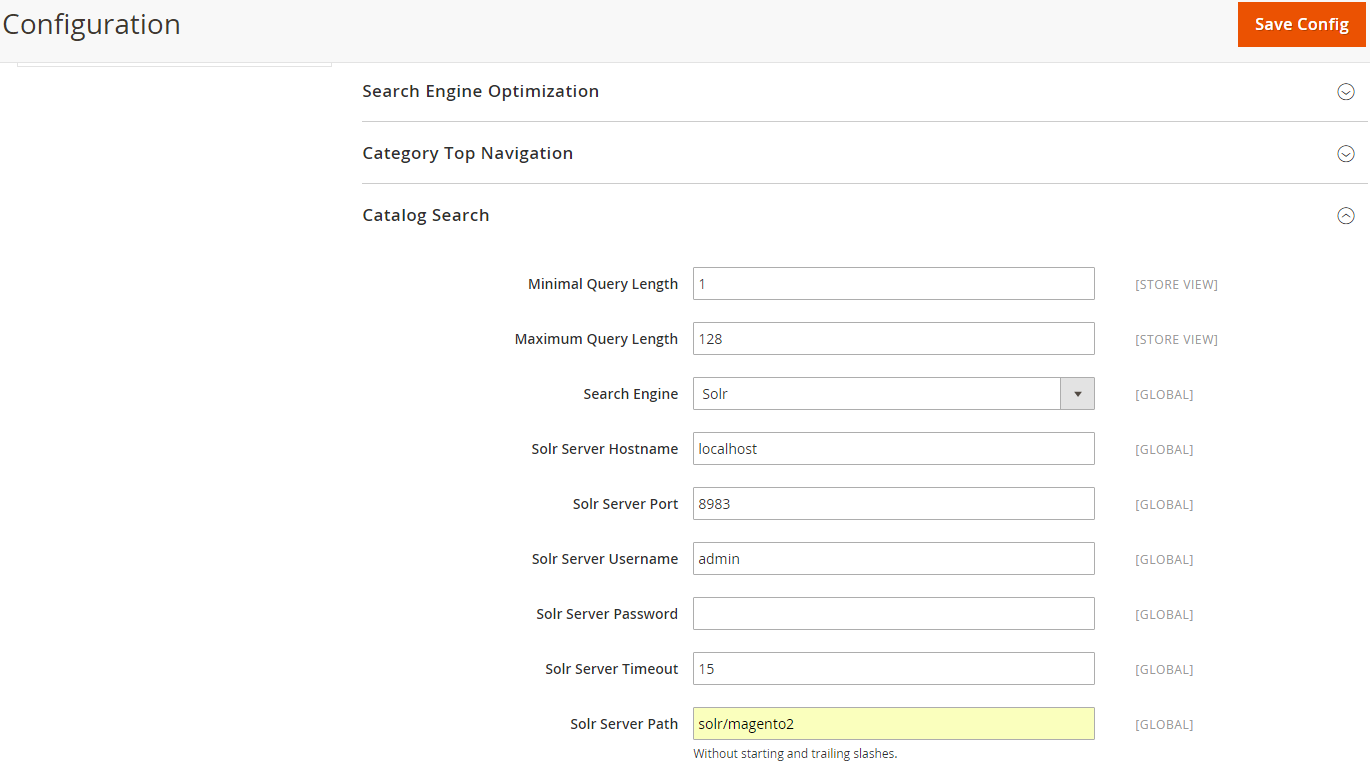
- Click STORES > Configuration > CATALOG > Catalog > Catalog Search.
- In the right pane, expand Catalog Search.
- The following table shows the minimum amount of information to enter to test the connection to your Solr search engine. Leave all other values at their defaults.
| Option | Description |
|---|---|
| Search Engine | Click Solr |
| Solr Server Hostname | Enter the fully qualified host name or IP address of the machine running Solr. (If Solr is running on the same host as Magento, you can optionally use localhost.) |
| Solr Server Port | Enter Solr's listen port. (The example Jetty servlet container uses 8983. The default for Tomcat is usually 8080.) |
| Solr Server Username | Optional. Enter a user name for Solr authentication, if desired. |
| Solr Server Password | Optional. Enter the user's password, if required. |
| Solr Server Timeout | Enter a connection timeout value, in seconds. |
| Solr Server Path | Specifies the path and name of the Solr web application. The path used by the example Solr configuration is If you customized Solr, the value you enter in this field must exactly match the value of |
The following figure shows an example.
Click Test Connection.
The button changes as follows.
| Button state | Meaning |
|---|---|
 |
The test connection succeeded. Click Save Config and continue with the next section. |
 |
The test connection failed. Try the following:
|
Only after the test connection succeeds, click Save Config and continue with the next section.
Reindexing catalog search and refreshing the full page cache
After you change MagentoвҖҷs Solr configuration, you must reindex the catalog search index and refresh the full page using the Admin or command line.
To refresh the cache using the Admin:
- In the Admin, click System > Cache Management.
- Select the check box next to Page Cache.
- From the Actions list in the upper right, click Refresh.
The following figure shows an example.

To clean the cache using the command line, use the magento cache:clean command.
To reindex using the command line:
- Log in to your Magento server as, or switch to, the Magento file system owner.
-
Enter the following command to reindex all indexers:
php <your Magento install dir>/bin magento indexer:reindexEnter the following command to reindex the catalog search index only:
php <your Magento install dir>/bin magento indexer:reindex catalogsearch_fulltext - Wait while the indexers are reindexed.
Unlike the cache, indexers are updated by a cron job. Make sure cron is enabled before you start using Solr.
Verify Solr is working
To verify Solr works, go to the storefront and search for any term (including one that wonвҖҷt return results) and look for the search in the Solr command window.
The following figure shows an example of a storefront search.
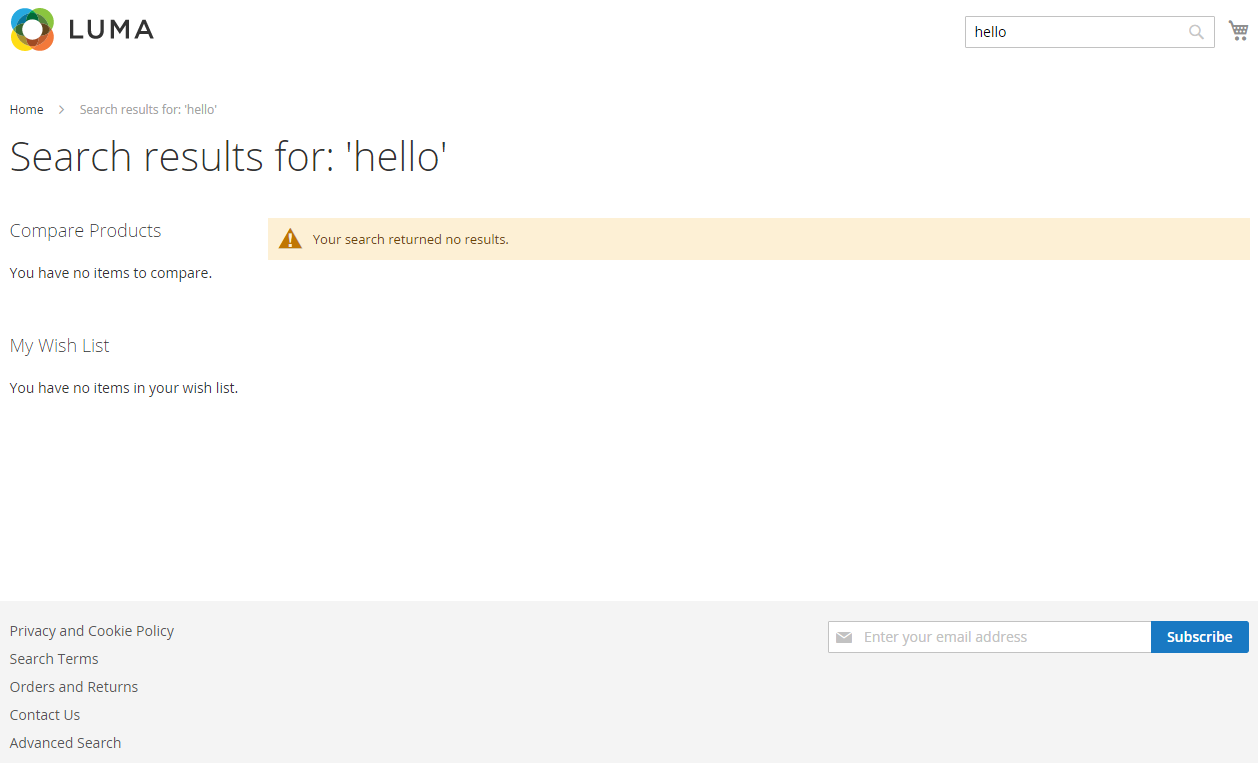
The following excerpt from the Solr command window shows the same search:
497008 [qtp2032251042-13] INFO org.apache.solr.core.SolrCore вҖ“ [magento2] webapp=/solr path=/select params={facet.field={!key%3Dcategory_bucket}category_ids&json.nl=flat&fl=id,score&start=0&fq=store_id:1&rows=10000&q=sku:((hello*+hello))+OR+fulltext_en:((hello*+hello))+OR+attr_color_en:((hello*+hello))+OR+attr_description_en:((hello*+hello))+OR+attr_manufacturer_en:((hello*+hello))+OR+attr_name_en:((hello*+hello))+OR+attr_short_description_en:((hello*+hello))+OR+attr_status_en:((hello*+hello))+OR+attr_tax_class_id_en:((hello*+hello))&f.category_ids.facet.mincount=1&omitHeader=true&stats=true&wt=json&facet=true&stats.field=price_0_1} hits=0 status=0 QTime=58
Find us on