Contents
This topic covers how to customize the content and design of email templates.
- Customize email templates
- Email styles
- Email logo
- Use contact information in emails
- Localization
- Supported email clients and devices
- Newsletter templates
Customize email templates
Email templates are stored in the <module_dir>/view/<area>/email directory of their respective modules. For example, the template for the new order transactional email for the Sales module is located in app/code/Magento/Sales/view/frontend/email/order_new.html.
We strongly recommend you not change the default Magento files. If you want to customize the default templates, you should create your custom templates and configure Magento to use them instead of the default templates.
You can add custom templates as physical files in your custom theme or create them using the Magento Admin. Both approaches are described in the following sections.
Customize email templates using a theme
Override email templates by creating templates in a new directory in your custom theme, using this pattern: <theme_dir>/<ModuleVendorName>_<ModuleName>/email. For example, to override the New Order email template, create a template named order_new.html in the <theme_dir>/Magento_Sales/email directory.
Template fallback is supported for email templates, so parent themes of your current theme are searched for templates.
Customize email templates using the Magento Admin
Any templates configured in the Magento Admin take precedence over default or theme-based templates.
- In the Magento Admin, navigate to MARKETING > Communications > Email Templates
- Click Add New Template.
-
If you want to use a default template as a starting point, in the Load default template section, choose the template and click Load Template. The path to the configuration settings for each default template displays in the Currently Used For field in the Template Information section.
Make note of this path because you will need it later when you configure this new template to be used instead of the default template.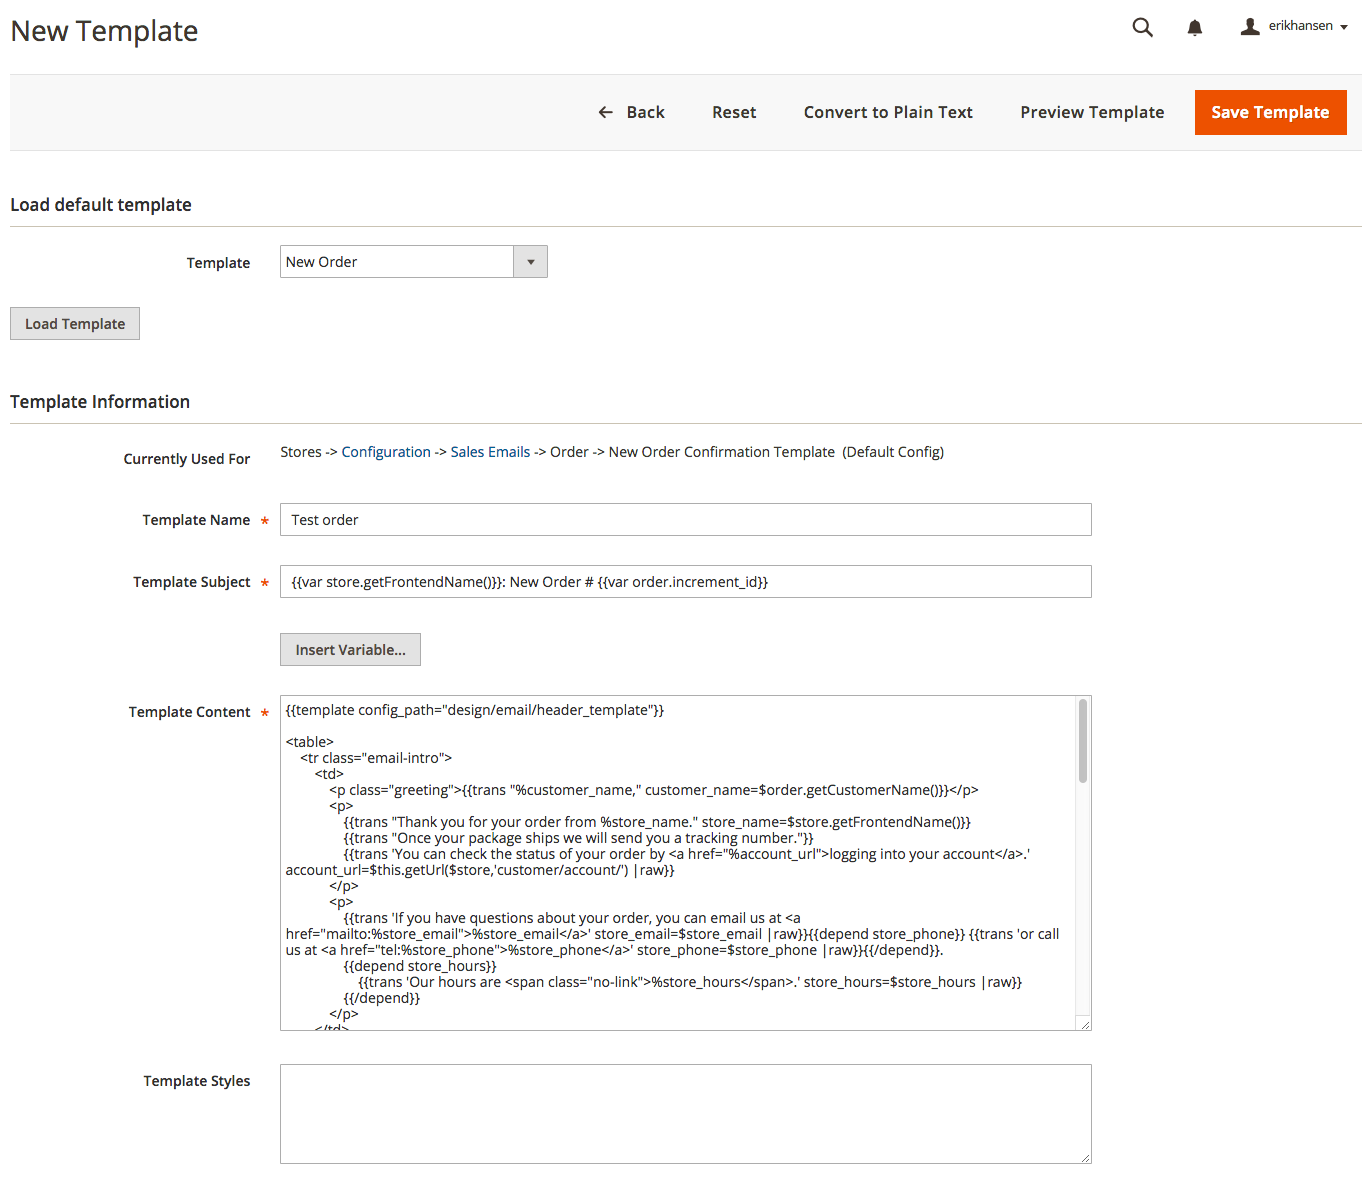
- In Template Name, enter a name to identify the template in the Magento Admin.
- In Template Subject, add plain text to use as the Subject of the emails sent using the template you create. This field can contain system variables.
- Customize template content. For details, see the section on customizing content.
- In Template Styles, optionally add CSS styles for the template. These styles are added inside of a
<style>tag in the<head>of the email. Typically, youвҖҷll use the LESS files to make style changes to emails because some email clients donвҖҷt support styles in<style>tags. - Click Save Template.
-
Now that you have created a template, you must configure that template to be used:
- If you havenвҖҷt done so already, log in to the Magento Admin as an administrator.
- Click STORES > Settings > Configuration > SALES > Sales Emails.
- In the left pane, locate the section that contains the template you want to override. This is the section referenced by Currently Used For in your new template. (See step 3 earlier in this section.)
For example, if you created a вҖңNew OrderвҖқ template, the configuration section is Order as the following figure shows.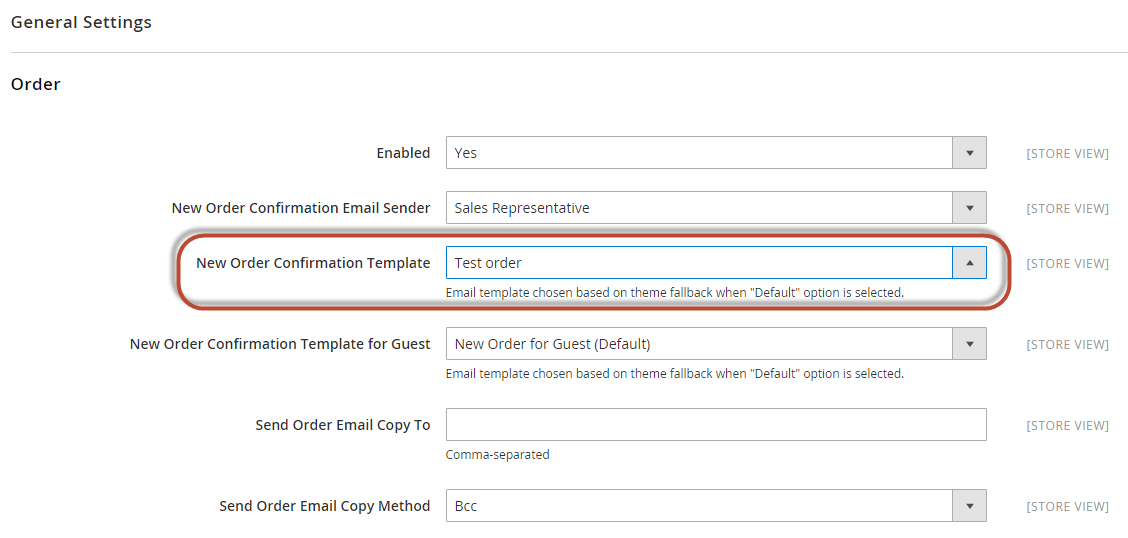
- Select your newly created template from the list.
- Click Save Config.
Customize header and footer templates
Every frontend email template includes a header and footer template using these two directives: {{template config_path="design/email/header_template"}} and {{template config_path="design/email/footer_template"}}. By default, those two directives load contents from these files:
You can customize header and footer templates using either the theme or admin customization methods discussed previously.
Customize email content
To add the store and sales related information to a template, use system variables.
System variables are placeholders which are replaced by particular values when the actual email is generated. For example, the {{var store_hours}} variable is replaced by the value set in the STORES > Settings > Configuration > GENERAL > General > Emails section.
You can also create your own custom variables and set their values in the Admin, under SYSTEM > Custom Variables.
To add a variable to your template content:
- In the Magento Admin, navigate to MARKETING > Communications > Email Templates
- Create a new template or edit an existing template.
- Click to place the cursor in the text in which to insert the variable.
-
Click Insert Variable. A pop-up containing a list of variables opens, including custom variables. The variables in the Store Contact Information are available in all email templates whereas the variables in the Template Variables section are specific to the template youвҖҷre editing. The following figure shows an example:
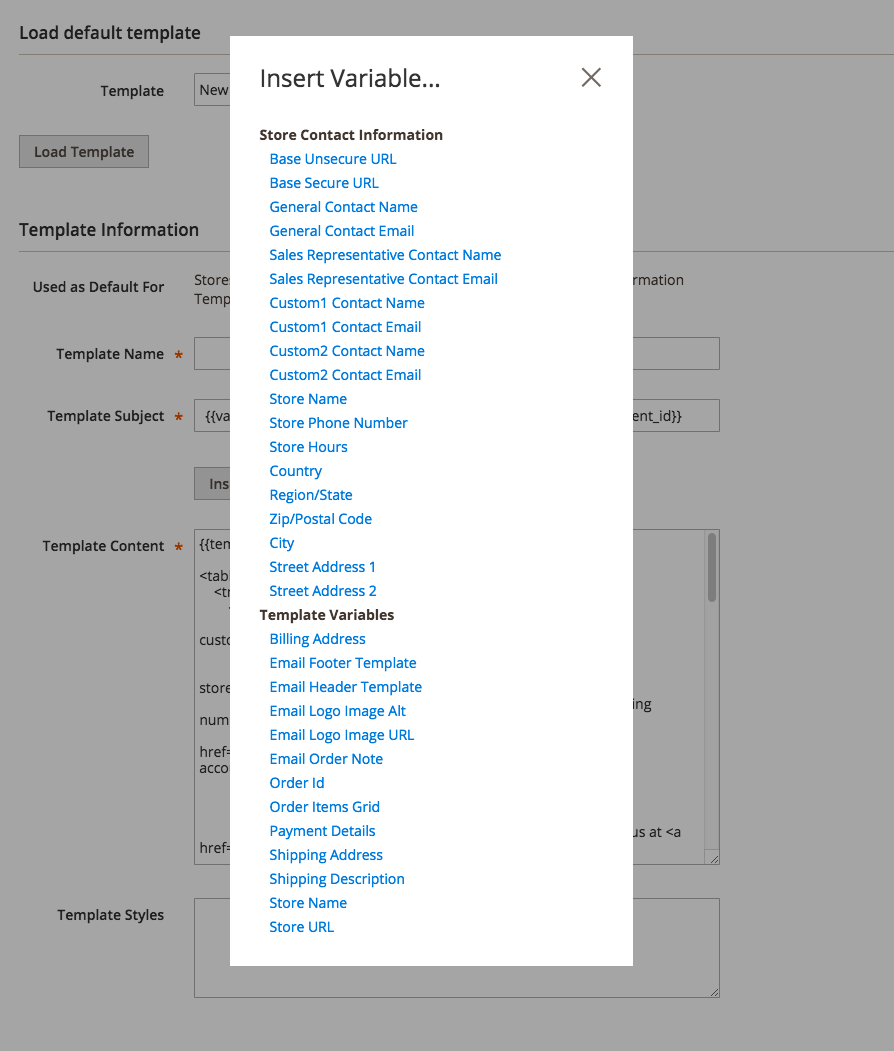
- Click the name of the required variable.
The variable code is inserted in the template content.
The selection of available variables depends on which template you use as a basis. The template-specific variables are contained in a <!--@vars @--> comment at the top of each template on the file system. (For example, look at app/code/Magento/Customer/view/frontend/email/account_new.html.
Styles for email templates
Some email clients (for example, Gmail) support only CSS styles that have been applied as вҖңinlineвҖқ styles on the style attribute of HTML tags. Because of this, the majority of email styles are applied as inline styles. Inline styling is provided by the Emogrifier library, which takes the HTML and CSS and adds all of the CSS styles to style attributes of the HTML tags.
Inline styles
The <Magento_Email_module_dir>/view/frontend/email/header.html file contains an inlinecss directive:
{{inlinecss file="css/email-inline.css"}}
The inlinecss directive tells Magento which files to apply as inline styles on the email template.
For example, letвҖҷs say an email is being sent from a store configured with the Magento Luma theme. The inlinecss directive first looks for a email-inline.less file in <Magento_Luma_theme_dir>/web/css/email-inline.less. However because that file doesnвҖҷt exist, it will fall back to the <Magento_Blank_theme_dir>/web/css/email-inline.less file. The contents of that file will then be compiled and its contents are applied as inline styles to the email template.
Refer to the Emogrifier README to see what CSS selectors are supported.
Non-inline styles
Non-inline styles for emails come from global and template-specific styles, as described in the following sections.
Global non-inline styles
While the majority of styles should be applied inline, there are certain CSS styles that canвҖҷt be applied inline, such as media queries or :hover pseudo styles. These styles must be in a <style type="text/css"></style> tag for them to work.
The <Magento_Email_module_dir>/view/frontend/email/header.html file contains a css directive inside of a <style> tag:
<style type="text/css">
    {{var template_styles|raw}}

    {{css file="css/email.css"}}
</style>
The css directive compiles the contents of the provided file and outputs it.
For example, letвҖҷs say an email is being sent from a store configured with the Magento Luma theme. The css directive first looks for an email.less file in <Magento_Luma_theme_dir>/web/css. However, because the file doesnвҖҷt exist there, it falls back to <Magento_Blank_theme_dir>/web/css/email.less. The contents of that file are compiled and its contents output in the <style> tag.
Template-specific non-inline styles
As mentioned in the preceding section, the header.html file outputs the {{var template_styles|raw}} variable.
The value of that variable comes from any of the following:
-
Any styles you add to any
htmlemail template inside a comment block, like in the following example, are included in thetemplate_stylesvariable:<!--@styles .example-style { color: green; } @--> -
If you customize transactional emails using the Magento Admin, you can add CSS styles to the Template Styles field to include those styles in the
template_stylesvariable.
How email styles are organized
The styles for emails are split into several different files.
| File | Description |
|---|---|
|
|
Imports necessary files and then outputs styles to be included in |
|
|
Contains |
|
|
Imports necessary files and then outputs styles to be inlined |
|
|
Contains majority of styles for emails, including resets, layout, typography, and so on. Review the comments at the top of this file to understand how the styles in this file are split between the |
|
|
This file is intended to be copied into your custom themes and edited directly. You can add new email styles or override existing ones. This should prevent having to copy the |
|
|
The |
|
|
Styles that are specific to modules are stored in these files. This mechanism also allows third-party extensions to include styles that will get included in the inline/non-inline output. |
|
|
Same as |
|
|
Contains new email-specific variables that can be overridden in a theme-specific |
When implementing a custom theme, you should be able to fully customize email templates by copying the <Magento_Blank_theme_dir>/web/css/source/_email-extend.less and <Magento_Blank_theme_dir>/web/css/source/_email-variables.less files to your custom theme and editing those files.
Custom fonts
Emails inherit the custom fonts that are defined by the frontend theme. The Magento Blank theme uses the Open Sans font. Because Open Sans is not a standard system font, @font-face rules are used to include web fonts.
Here is an overview of how the font structure for emails works:
-
<Magento_Blank_theme_dir>/web/css/source/_email-extend.lesscontains the@importdirective that requests theemail-fonts.cssfile.The reason the contents of
email-fonts.cssare loaded using@importrather than being output directly into a<style>tag in the<head>of an email is that if a user is reading their email offline, some email clients donвҖҷt render the text because the web fonts canвҖҷt be loaded. -
The
<Magento_Blank_theme_dir>/web/css/email-fonts.lessfile importssource/_variables.lessandsource/_typography.lessfiles:- app/design/frontend/Magento/blank/web/css/source/_variables.less defines which font is used in the
@font-family-name__basevariable. - app/design/frontend/Magento/blank/web/css/source/_typography.less generates the
@font-facerules which import the custom fonts.
- app/design/frontend/Magento/blank/web/css/source/_variables.less defines which font is used in the
If you want to change the font used for emails, do the following:
- Refer to the documentation on using fonts for details on how to add a new font.
- After youвҖҷve added a new font and have updated the
source/_variables.lessandsource/_typography.lessfiles for your custom theme to refer to the new font, the emails should automatically use the specified font.
Email logo
You can add a logo to emails by adding it to your theme or by uploading it in the Magento Admin.
Because email clients donвҖҷt support vector-based formats such as Scalable Vector Graphics (SVG), you must prepare a Portable Network Graphics (PNG) logo. Because emails are viewed on devices with a broad range of pixel densities, you should use a logo that is 3Г— the size that you actually want it to display. For example, letвҖҷs say your email has a 200px Г— 100px area for the logo. The logo image should be 600px Г— 300px.
If you donвҖҷt have access to a high-resolution version of your logo, you can upload a normal-resolution image. For example, if your logo image is 200px Г— 100px, specify 200 for the width and 100 for the height.
Customize the email logo using a theme
To customize your logo using a theme:
-
Add a file named
logo_email.pngto aMagento_Email/webdirectory in your custom theme.For example, if the OrangeCo vendor wants to add a logo for their custom Orange, they must add a file in the
app/design/frontend/OrangeCo/orange/Magento_Email/webdirectory. -
Copy the
<Magento_Email_module_dir>/view/frontend/email/header.htmlfile into aMagento_Email/emaildirectory in your theme.For example, the OrangeCo vendor would copy the file to this location:
app/design/frontend/OrangeCo/orange/Magento_Email/email/header.htmlEdit the
widthandheightattributes of the<img>tag to reflect the area in which you want your logo to display (for example, 200 Г— 100).Example:
{{if logo_width}}
    width="{{var logo_width}}"
{{else}}
    width="200"
{{/if}}

{{if logo_height}}
    height="{{var logo_height}}"
{{else}}
    height="100"
{{/if}}
You should leave the if/else conditional statement in place in case you ever want to override these values using the Admin.
Customize the email logo using the Admin
- In the Magento Admin, navigate to STORES > Settings > Configuration > GENERAL > Design > Emails
- In the Scope drop-down list, select the scope for which you want to set a logo (a certain store view, the whole website, or default config).
-
Upload your logo and specify the alternative text for it.
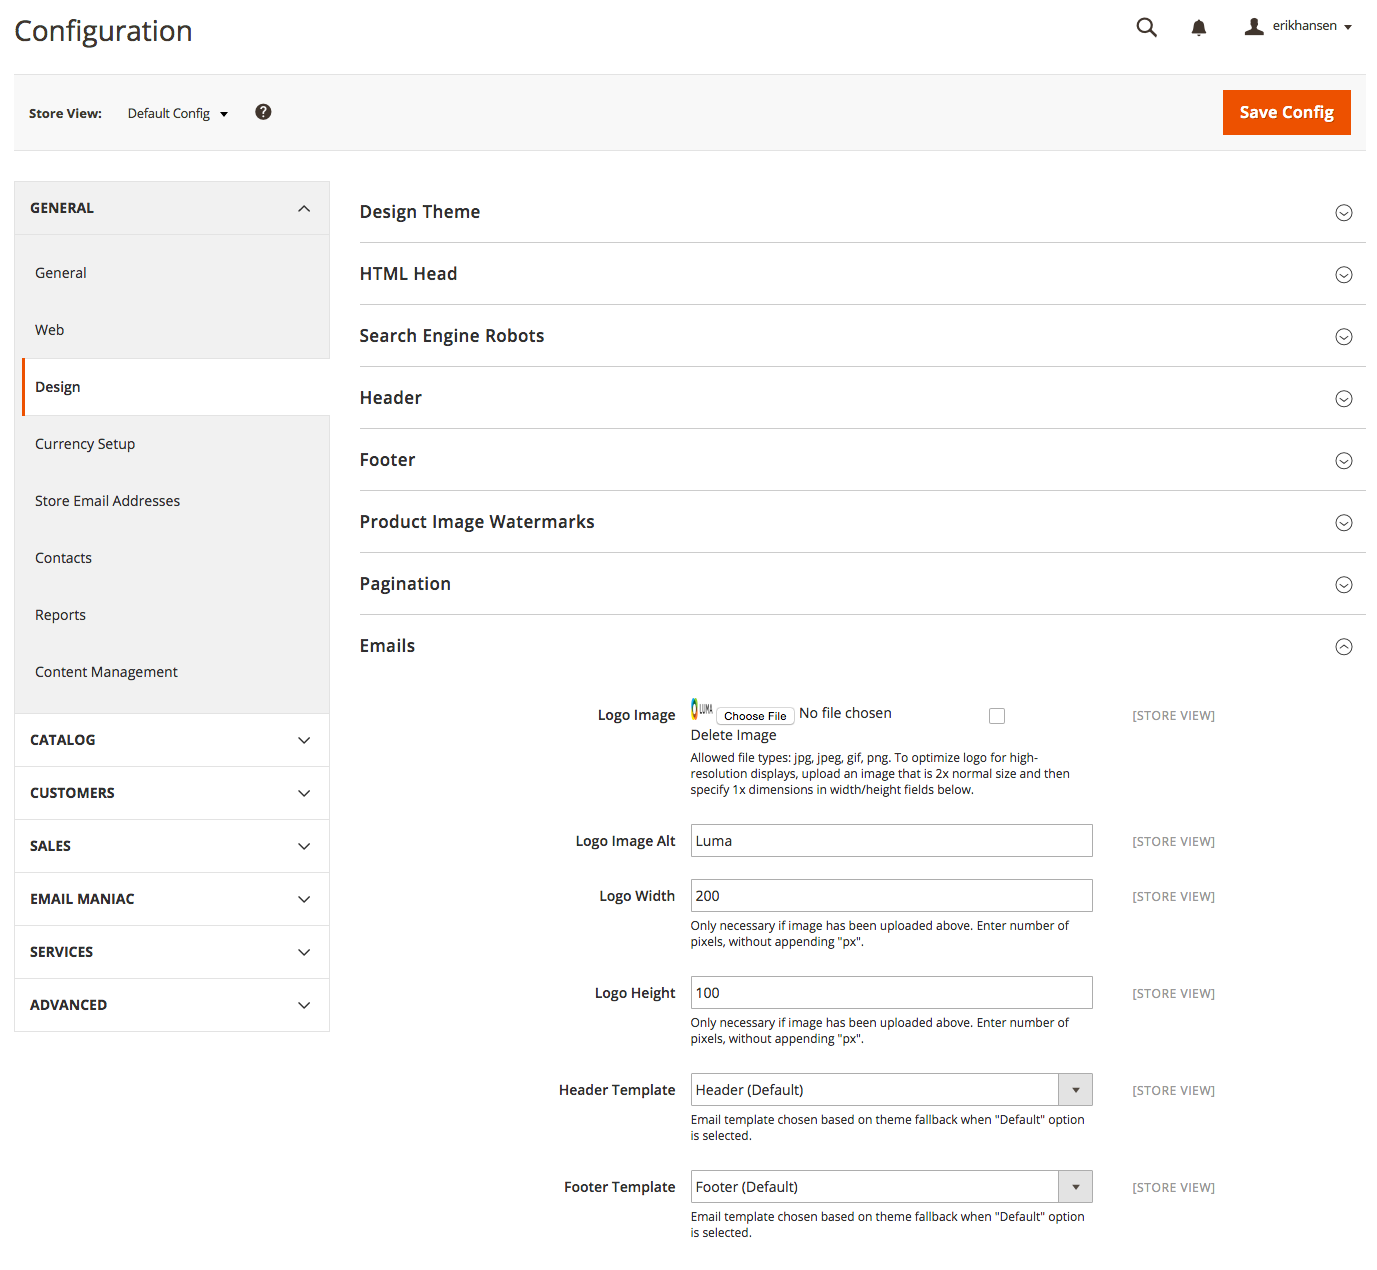
- Enter values for Logo Width and Logo Height. Based on the preceding example, you would enter
200and100, respectively. - Click the Save Config button.
Use contact information in emails
Emails can output your store name, store email address, store phone number, and store hours of operation if those values are configured in the Admin.
To set those values:
- To set the store name, phone number, and hours of operation:
- In the Magento Admin, navigate to STORES > Settings > Configuration > GENERAL > General > Emails
- Input values into the Store Name, Store Phone Number, and Store Hours of Operation fields.
- Note: The Store Phone Number and Store Hours of Operation fields are optional.
- Click the Save Config button.
- To set the store email:
- In the Magento Admin, navigate to STORES > Settings > Configuration > GENERAL > General > Store Email Addresses > General Contact
- Input values into the Sender Name and Sender Email fields.
- Click the Save Config button.
The sales emails are configured to display all of the above values, if theyвҖҷre configured in the admin. If you want to add those values to other email templates, you can use the following variables:
{{var store.getFrontendName()}}
{{var store_email}}
{{var store_phone}}
{{var store_hours}}
Localization
In order to support the translation of content, all strings in emails are output using the trans directive. Example:
{{trans "Thank you for your order from %store_name." store_name=$store.getFrontendName()}}
{{trans "Once your package ships we will send you a tracking number."}}
The trans directive will translate strings into whatever locale is configured for the store from which the email is being sent. For example, if an email is being sent from a store view that is configured to use the fr_FR locale, the emails are translated to French.
Please note, that variable assignment must not contain spaces.
Correct:
{{trans "Thank you for your order from %store_name." store_name=$store.getFrontendName()}}
Incorrect:
{{trans "Thank you for your order from %store_name." store_name = $store.getFrontendName()}}
Exception: argument value can contain spaces if it is enclosed in brackets.
Supported email clients and devices
We tested responsive emails using a combination of real devices and Litmus. Due to the greatly varied level of support among email clients for modern web technologies, not all email clients rendered the emails perfectly. However, all of the following clients should render the emails in a manner that allows them to be easily read without obvious issues.
- Supported Desktop Clients
- Apple Mail 7 (OS X 10.9)
- Apple Mail 8 (OS X 10.10)
- Outlook 2003 (Windows 7)
- Outlook 2007 (Windows 7)
- Outlook 2010 (Windows 7)
- Outlook 2013 (Windows 7)
- Outlook 2016 (OS X 10.10)
- Supported Mobile Clients
- Native email app (Android 2.3)
- Native email app (Android 4.2)
- Gmail app (Android 4.2)
- Native email app (Blackberry 5 OS)
- iOS 7 (iPhone 5s)
- iOS 8 (iPad Retina)
- iOS 8 (iPad Mini)
- iOS 8 (iPhone 6)
- iOS 8 (iPhone 6 Plus)
- Windows Phone 8
- Supported Web Clients (tested in combination of Firefox, Chrome, and Internet Explorer)
- AOL Mail
- Gmail
- Office 365
- Outlook.com
- Yahoo! Mail
Newsletter templates
The focus of this article is on transactional emails but the same techniques can be used with newsletter templates as well, including:
- Import the header and footer using
{{template config_path="design/email/header_template"}}and{{template config_path="design/email/footer_template"}} - Apply inline styles using
{{inlinecss file="css/email-inline.css"}} - Include non-inline styles using
{{css file="css/email.css"}}
Find us on